Madder Root + Buckthorn Peace Silk Bundle Dye Tutorial (in collaboration with Naturally Dyed Goods)

We are excited to share with you a step-by-step tutorial for dyeing our hand-woven peace silk shawl (buy here) with using our Madder (buy here) and Buckthorn (buy here) powders and bundle-dye process done and written by Naturally Dyed Goods. Take a look at the final results, it's simply amazing. Bundle dyeing with powdered dyes is variegated, almost tie-dyed colors it can create and it’s a very efficient use of dye materials: you can get strong, vibrant hues with very small amounts of plant powders and the dyestuff are in direct contact with the fibers. This would be a very accessible project for a first-time natural dyer, so don’t be afraid to jump in and give it a go!
Supply List
- Handwoven peace silk shawl (any of the available sizes or fabric blends would work just fine!)
- Aluminim potassium sulfate
- Buckthorn seed powder (3.5 oz)
- Madder root powder (3.5 oz)

You’ll also need:
- A stock pot that is not used for cooking
- An old steam basket or colander
- Cotton string or rubber bands
- A mask to protect yourself from inhaling fine particles
Step One: Scour and Mordant
First, you’ll need to scour and mordant your silk shawl. Scour—a fancy word for wash REALLY well—the silk by washing it in hot water with a hearty amount of pH-neutral soap. (You can also use a product called Synthrapol, but most plant-based dish soaps are perfectly sufficient.) Rinse well. To mordant, measure alum at between 10-15% weight of fabric/fiber (WOF). As a reference point, this project required what appeared to be roughly 3 tablespoons of alum. Dissolve the alum in enough hot water to submerge your silk. Soak silk in solution for at least 6 hours, but overnight is best.
Step Two: Design and Place Plant Powders
Wring out your now-mordanted shawl and spread it out on a clean surface. Now this is where your one-of-a-kind creation will begin to take shape! Basically, there are no rules for sprinkling the dyes onto your silk, but how you do so will determine a lot about what colors and patterns result. (Now’s a good time to put on your mask, too.) Depending on the quantity and placement of the plant powders, you can influence the intensity, gradation, and amounts of color present on your final piece, so consider what you hope to achieve with color and how you might go about doing so.
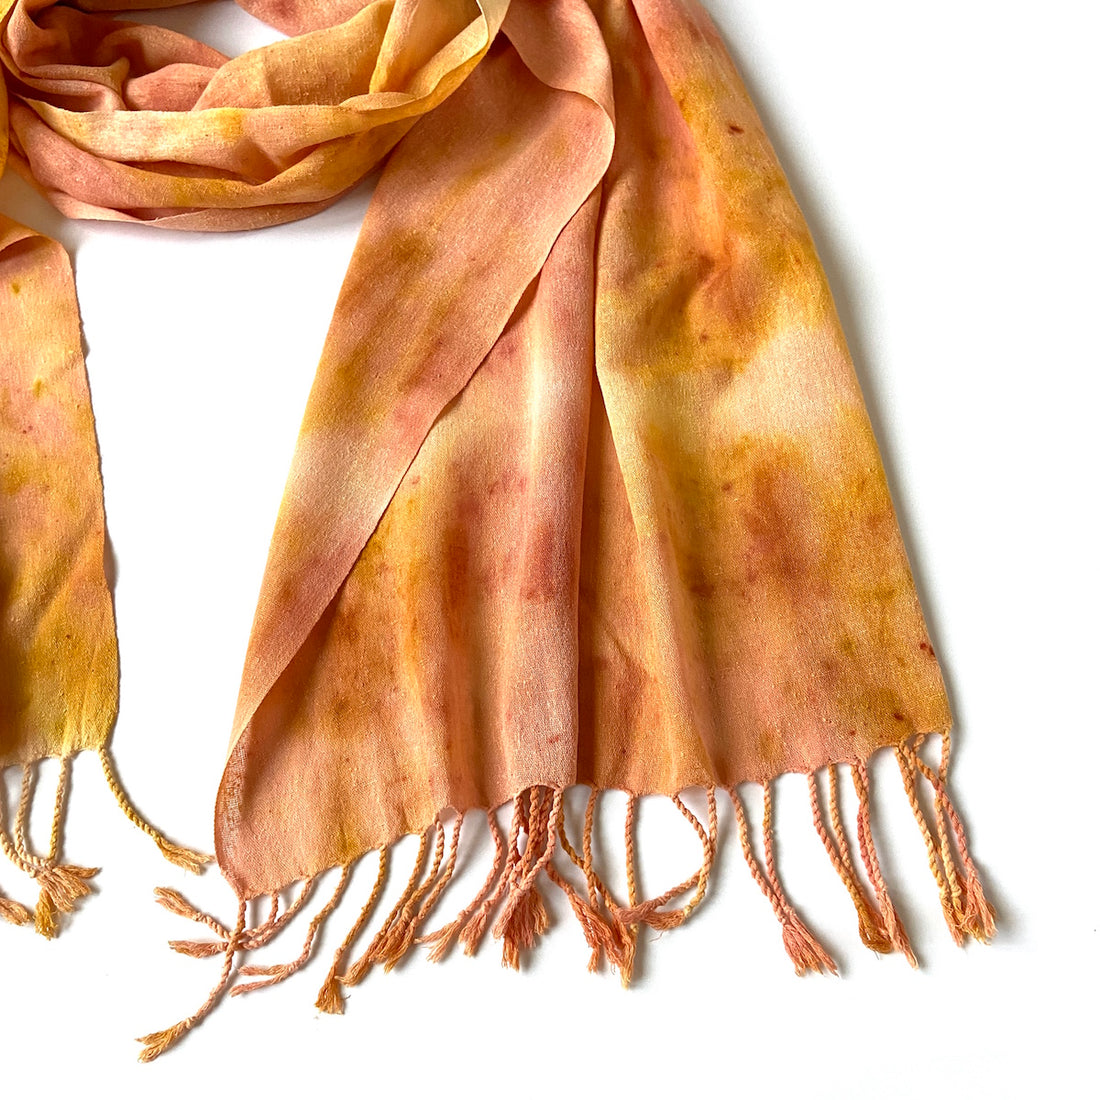
Naturally Dyed Goods wanted a random tie-dye inspired design, with more red than yellow, so she placed the madder root powder on the shawl first. The buckthorn powder produces a VERY strong yellow, so she used this as more of an accent color, filling in with very small amounts between the madder root. As you can see in the photos, she did not use very large amounts of either dye, though, because as it's mentioned in the introduction: bundle dyeing with plant powders requires very little dye stuff. These are powerful pigments applied directly to the fibers (yay!). You could play with an ombré-style gradient, and use madder powder on one end, buckthorn powder on the other, and a mixture in the middle. Decide what balance of colors you’d like, and how you want them distributed, and place the dye powders on your silk accordingly.
Next, roll your scarf into a bundle and tie with cotton string or rubber bands. You want this to be fairly tight, so the plant powders remain in contact with the fabric as they steam. I made sure to tuck in the fringe on either ends to give them a chance to get some color, too. A note: wherever there are folds, you’ll likely see creases and/or symmetry in the print. You can use this to your advantage if you want to play with creating symmetrical or repeating prints!


Step Three: Steam and Rest
Steam your bundled shawl in a steamer basket or old stainless steel colander for 45 minutes-1 hour. (If your silk has dried out again before it reaches the steam basket, you can give it another dip in the water or mordant solution if you want more all over saturated colors.) Let rest for as long as you can wait. I prefer to wait 24 hours at least. This is the hardest part, but I promise it’s worth it for the resulting colors!


Step Four: Unbundle, Wash + Press
Now, open up your plant-dyed present and see what you’ve created! Rinse well and then wash in cool water with pH-neutral soap. Rinse again and air dry. Iron on low while still damp for the crispest press.
Wear and enjoy!

This article written by Mykala Micek from Naturally Dyed Goods.